She cut 2 holes in an Ikea table to create an amazing project!
Do you have plenty of LEGOs scattered all over the house? Especially on the kitchen table?
Then why don’t you try and take after this mom, Sarah, who had the genius idea to transform a table, to make it a practical surface to play on and place it in her son’s room.
These photos and tips will explain precisely how do make this table transformation.
What you will need:
- IKEA Ingo dining table
- Two IKEA Trofast buckets
- Drill
- A spade bit
- Jigsaw
- Sand paper
- Spray paint
- Super glue and clear sealant
- A pencil and an eraser
Steps:
- Draw the outlines of the two plastic buckets on the table with a pencil – 10 cm (4") from the sides of the table and 5 cm (2.5") from the top of the table.
- Follow the measures exactly as pictured.
- With the jigsaw, start making your large holes where the buckets will sit.
- Cut straight lines and sand the edges.
- Erase pencil marks.
- Spray paint the table surface in layers.
- Once the paint dries, glue down the gray Lego base plate.
So there, you’ve just created your children’s dream! It’s something they can brag about when they invite their friends.
Decorate in your style and complete it with chairs.
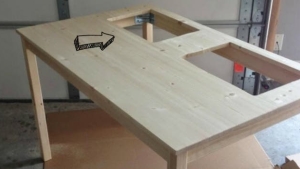
1. The table

2. Follow the measures on the diagram.

3. Be precise!

4. Make holes with the drill.

5. The first hole

6. The two finished holes

7. Spray paint the surface.

8. Glue down the Lego base plates.

9. Job complete!

10.Lego base plate.

11. Incorporating Legos

12. Every mother and child's dream


By Straker Julia
Writer
Passionate about writing, I write articles on the subjects that I love. Creativity and Animals themes are my favorites!